
Moist Red Velvet cake is more than just a striking red dessert—it’s a delicious blend of flavors, textures, and nostalgia. Its soft, buttery crumb and slight cocoa flavor, perfectly balanced with a tangy cream cheese frosting, make it a classic crowd-pleaser. But creating the perfect moist red velvet cake recipe isn’t just about mixing ingredients and baking—it’s an art. From choosing the right ingredients to following essential baking tips, this guide covers it all. Whether you’re a seasoned baker or a beginner, you’ll learn how to make a cake so moist and flavorful that everyone will ask for seconds!
Table of Contents
Introduction to Moist Red Velvet Cake
What Makes Moist Red Velvet Cake Unique?
What sets red velvet cake apart from other cakes isn’t just its color. Sure, the bright red hue is iconic, but the secret lies in its velvety texture and slightly tangy, sweet flavor. Unlike traditional chocolate cakes, red velvet has a subtle cocoa note that’s beautifully enhanced by ingredients like buttermilk and vinegar. The result is a cake that’s moist, soft, and unlike any other dessert.
Moist Red Velvet cake isn’t overpoweringly sweet—it’s perfectly balanced. The combination of its tender crumb and luscious cream cheese frosting creates a mouthwatering bite that leaves you wanting more. This is why it’s a staple for birthdays, weddings, and special celebrations!
The Origin and Popularity of Moist Red Velvet Cake
Where did this vibrant cake come from? Many believe it originated in the early 1900s, gaining widespread popularity in Southern kitchens and bakeries. During the Great Depression, bakers enhanced the red color using beets to make the dessert more visually appealing when food coloring was scarce. Today, the Southern Moist Red Velvet cake has become a symbol of classic American baking, beloved across the globe.
With modern twists, natural coloring options, and enhanced baking techniques, red velvet continues to evolve, but its charm remains timeless. Ready to dive into making your own moist red velvet cake? Let’s start by understanding the ingredients that make it shine. 🍰
Key Ingredients for a Moist Red Velvet Cake
Creating the perfect moist red velvet cake recipe requires more than just following instructions. Each ingredient plays a critical role in ensuring that the cake turns out soft, flavorful, and irresistibly moist. Let’s break down the key ingredients you’ll need.
The Role of Buttermilk and Vinegar (Moisture and Flavor)
If you’ve ever wondered what gives red velvet its tender, moist crumb, look no further than buttermilk and vinegar. Buttermilk not only enhances the cake’s flavor with its tangy profile but also keeps the crumb light and moist. The acidity from both buttermilk and vinegar interacts with baking soda, creating that wonderful rise without making the cake dense. Together, they’re the secret sauce to that melt-in-your-mouth texture!
Tip: If you don’t have buttermilk on hand, mix a tablespoon of vinegar or lemon juice with a cup of milk and let it sit for a few minutes. It works like a charm!
Cocoa Powder and Its Subtle Flavor Impact
Moist Red Velvet cake isn’t a chocolate cake, but it does contain a small amount of cocoa powder, which adds depth to its flavor. Unlike rich chocolate cakes, red velvet balances this subtle cocoa flavor with sweet and tangy notes. Make sure to use unsweetened natural cocoa powder for the best results. Too much, and you’ll lose the iconic flavor balance.
Food Coloring: Traditional Red vs. Natural Alternatives
The bright red color of a classic Moist Red Velvet cake is iconic. Traditionally, bakers used beet juice to achieve the hue, especially during times when artificial food coloring wasn’t available. Today, many bakers opt for red food gel for a bold color, while some still stick to natural alternatives like beet powder or pomegranate juice for a healthier twist.
However, the color shouldn’t overpower the taste. A hint of vibrancy is all you need! Using too much food coloring can result in a bitter aftertaste, so moderation is key.
Step-by-Step Preparation of Moist Red Velvet Cake
Ready to bake the most moist red velvet cake recipe? Follow these step-by-step instructions for guaranteed success.
Preparing the Wet Ingredients
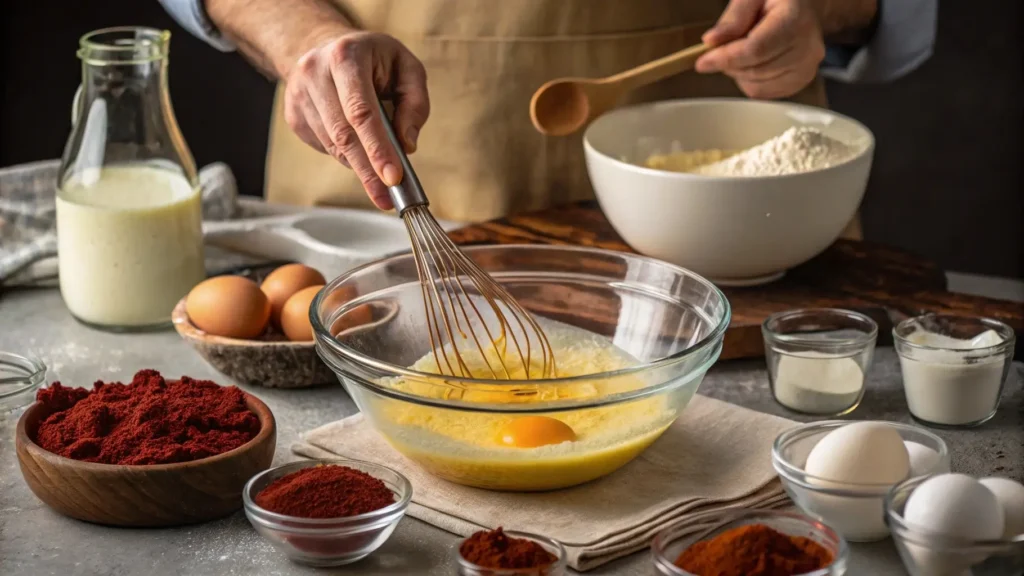
Start by gathering your wet ingredients: buttermilk, eggs, oil (or melted butter), and vanilla extract. The combination of oil and buttermilk is what keeps this cake ultra-moist. Beat the eggs in a large mixing bowl, then add the oil and sugar, whisking until smooth. Stir in the buttermilk, vinegar, and vanilla extract for that signature flavor.
Tip: Avoid overmixing at this stage, as you don’t want to overwork the gluten in the flour later.
Mixing the Dry Ingredients Separately
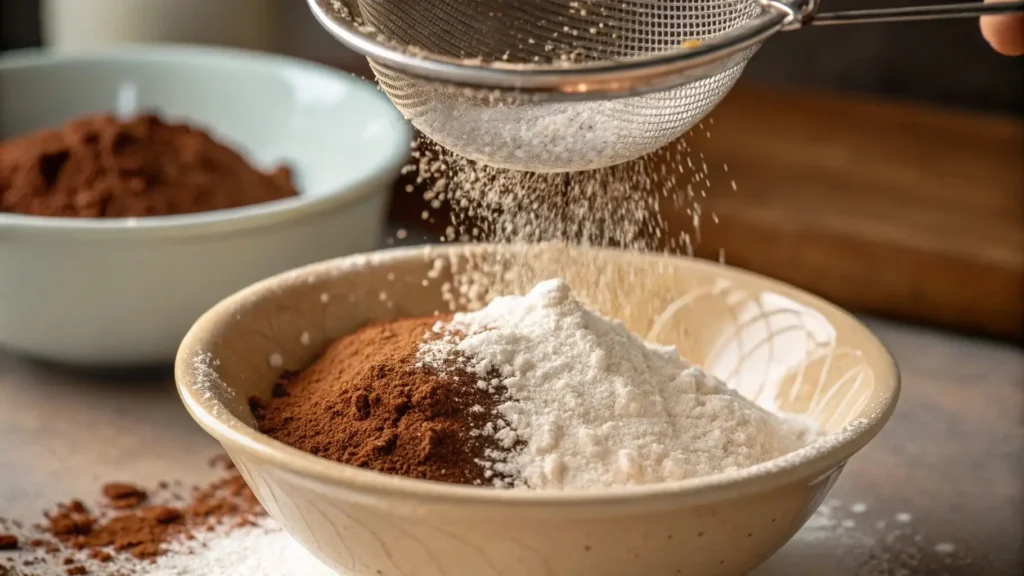
In a separate bowl, sift together the dry ingredients: all-purpose flour, cocoa powder, baking soda, and a pinch of salt. Sifting is crucial because it helps aerate the flour and evenly distributes the cocoa powder for a uniform color and taste.
Combining and Beating for Optimal Texture
Now comes the important part—combining the wet and dry mixtures. Gradually add the dry ingredients to the wet mixture, folding gently to combine. As soon as the batter comes together, stop mixing. Overmixing can lead to a dense, chewy cake instead of a soft, moist texture.
Pouring, Baking, and Cooling
Grease your cake pans with butter or line them with parchment paper for easy removal. Pour the batter evenly and tap the pans gently on the counter to remove any trapped air bubbles. Bake in a preheated oven at 350°F (175°C) for 25–30 minutes or until a toothpick inserted into the center comes out clean.
Once baked, allow the cakes to cool in the pan for 10 minutes before transferring them to a wire rack to cool completely. This prevents sogginess and ensures the cake maintains its perfect crumb. For more baking tips, you can explore related articles like this guide on moist chocolate cake for helpful tricks.
Tips for Achieving a Super Moist Texture
Achieving a perfectly moist red velvet cake recipe comes down to a few tried-and-true techniques. Follow these tips, and you’ll get a cake with a tender crumb, rich flavor, and moist interior every single time.
Measuring Ingredients Precisely
Baking is a science, so precise measurements matter. Using too much flour or cocoa powder can result in a dry, dense cake. Always use measuring cups for dry ingredients and liquid measuring tools for wet ones. Better yet, weigh your ingredients using a kitchen scale for accuracy.
Tip: Sifting the flour and cocoa powder beforehand prevents clumps and ensures a smooth batter.
Avoiding Overmixing the Batter
One of the most common mistakes when baking cakes is overmixing. Once you combine the wet and dry ingredients, stir just until everything is incorporated. Overmixing activates the gluten in the flour, leading to a dense, chewy texture instead of the light, velvety crumb you’re aiming for.
Gently fold the batter with a spatula to maintain its airy consistency. If you’re unsure, stop mixing as soon as no visible streaks of flour remain.
The Importance of Baking at the Right Temperature
Baking at a consistent temperature is crucial for retaining moisture. Preheat your oven to 350°F (175°C) and avoid opening the door frequently while the cake is baking, as it can cause temperature fluctuations. Uneven heat can dry out the edges of the cake while leaving the center underbaked.
An oven thermometer is a handy tool to ensure your oven’s actual temperature matches the setting.
The Role of Syrups and Moistening Agents (Optional)
To take your cake’s moisture level to the next level, you can brush a simple syrup made of sugar and water onto the layers after they’ve cooled. Some bakers even use a buttermilk soak for added tang and moisture. Be sure to apply it sparingly—you want moist, not soggy!
For an ultra-rich twist, try incorporating cream cheese or whipped cream between the layers.
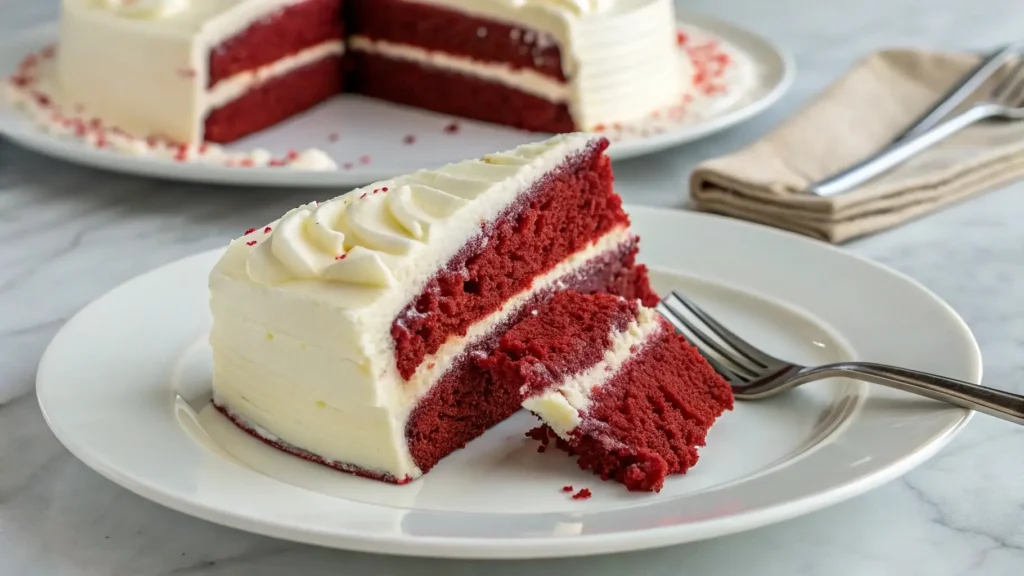
Perfect Cream Cheese Frosting for Moist Red Velvet Cake
No moist red velvet cake recipe is complete without the iconic cream cheese frosting. Its smooth, tangy flavor pairs beautifully with the sweet, velvety cake, making it the perfect finishing touch. Here’s how to get it right.
Ingredients for a Rich Cream Cheese Frosting
You’ll need:
- 8 oz cream cheese (room temperature)
- ½ cup unsalted butter (softened)
- 4 cups powdered sugar
- 1 tsp vanilla extract
- A pinch of salt (to balance the sweetness)
The key is using softened cream cheese and butter, which ensures a smooth, lump-free texture. If the ingredients are too cold, you risk getting a clumpy frosting.
How to Achieve the Right Consistency
Start by beating the cream cheese and butter together until light and fluffy—this usually takes 2-3 minutes. Gradually add the powdered sugar, one cup at a time, mixing on low speed to avoid a sugar cloud in your kitchen. Once all the sugar is incorporated, stir in the vanilla and salt.
If the frosting seems too thick, add a splash of heavy cream or milk until it reaches your desired consistency. For a thicker frosting, add more powdered sugar.
Techniques for Layering and Spreading
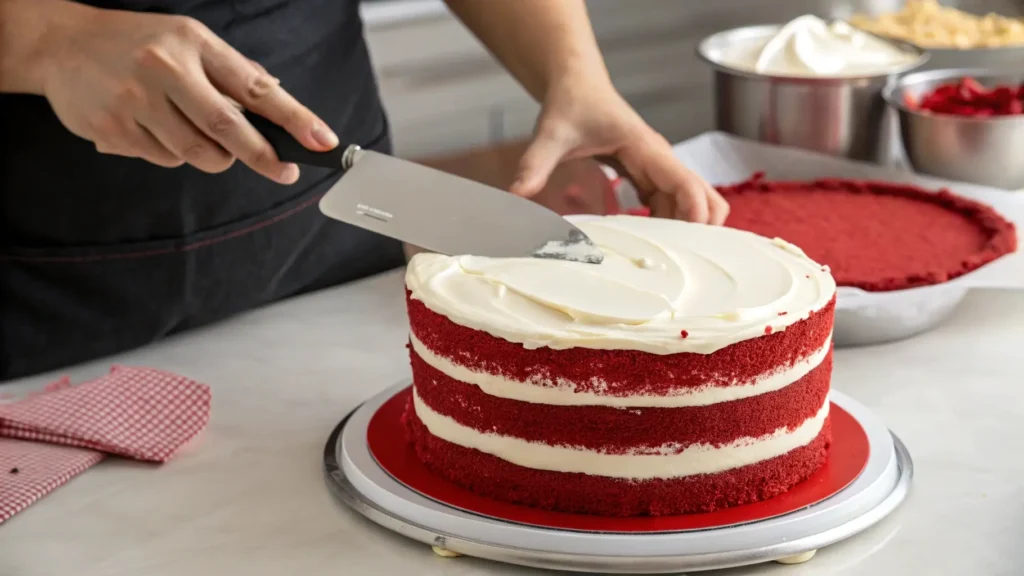
When your cakes have cooled, spread a thin crumb coat of frosting over each layer and refrigerate for 30 minutes. This will help seal in any loose crumbs and give you a clean, smooth finish when applying the final layer.
Use an offset spatula to spread the frosting evenly, working from the center of the cake outward. Finish with decorative swirls or pipe the edges for a more refined look.
Common Mistakes to Avoid
Even the best bakers encounter hiccups when making a moist red velvet cake recipe. To ensure your cake turns out tender and moist, watch out for these common mistakes.
Overbaking or Undercooking the Cake
Timing is everything. Overbaking dries out the cake, while underbaking leaves it dense and gummy. Always set a timer and check for doneness using the toothpick test. Insert it into the center—if it comes out clean or with a few moist crumbs, it’s ready.
Tip: Start checking the cake 5 minutes before the suggested baking time to avoid overbaking.
Using the Wrong Type of Cocoa Powder
Moist Red Velvet cake calls for natural cocoa powder, not Dutch-processed. Natural cocoa has the acidity needed to react with vinegar and buttermilk, creating the cake’s distinct flavor and light texture. Using the wrong kind may alter the taste and leave your cake too dense.
Excessive Food Coloring or Overpowering Flavor
It’s tempting to go all-in on the vibrant red, but too much food coloring can make the cake taste bitter. Instead, use just enough to achieve the classic red hue without overpowering the taste. Balance is key—focus on flavor first, color second.
Avoiding these mistakes guarantees a soft, flavorful cake every time!
Serving Suggestions and Presentation Ideas
Now that you’ve perfected your moist red velvet cake recipe, it’s time to impress your guests with stunning presentation and thoughtful pairings.
Pairing with Beverages
Moist Red Velvet cake pairs beautifully with rich, creamy drinks that enhance its sweet-tangy profile. Serve it with a cup of hot coffee, a mocha latte, or even a glass of cold milk for a classic touch. If you prefer something more festive, a chilled glass of sparkling wine or cream liqueur will elevate any celebration.
For a cozy night in, consider pairing it with a homemade hot chocolate topped with whipped cream. The balance of chocolate and cream complements the subtle cocoa flavor in the cake.
Decoration Ideas: Classic vs. Modern Twists
For a classic presentation, stick to simple swirls of cream cheese frosting and a light dusting of cocoa powder or red velvet crumbs. This timeless look never goes out of style.
If you’re feeling adventurous, try a modern twist. Add edible flowers, white chocolate shavings, or a drizzle of salted caramel for a unique flair. You can even turn it into a layered naked cake, where the frosting is minimal, letting the cake layers peek through for a rustic vibe.
No matter the occasion, this cake’s beauty lies in its versatility. Whether dressed up or kept simple, it’s guaranteed to be the star of any table! 🌟
Storing and Freezing Moist Red Velvet Cake
Knowing how to store your moist red velvet cake recipe properly ensures it stays fresh and delicious for days—or even weeks if frozen. Let’s explore the best techniques.
Proper Storage for Freshness
If you plan to enjoy the cake within a few days, store it at room temperature or in the refrigerator. To keep it moist, cover the cake with plastic wrap or place it in an airtight container. Leaving it exposed can cause the cake to dry out, especially when refrigerated.
At room temperature, the cake will stay fresh for up to 2 days. In the fridge, it can last for about a week. If using cream cheese frosting, refrigeration is a safer option to prevent spoilage.
Freezing Leftovers and Defrosting Tips
Want to save some slices for later? Freezing is a great option. Wrap individual slices or entire layers tightly in plastic wrap, then place them in freezer-safe bags. This double layer of protection prevents freezer burn and locks in moisture.
When you’re ready to eat, thaw the cake by placing it in the refrigerator overnight. Once defrosted, let it sit at room temperature for 30 minutes before serving. This method preserves its texture and ensures it tastes as fresh as the day you made it!
FAQs About Moist Red Velvet Cake Recipe
1. What makes red velvet cake moist?
The key to a moist red velvet cake recipe lies in the combination of buttermilk, oil, and vinegar. Buttermilk and vinegar add moisture and activate the baking soda, creating a soft, tender crumb. Using oil instead of butter also helps retain moisture, especially after baking.
2. Why is vinegar important in red velvet cake?
Vinegar enhances the texture and flavor of red velvet cake. It reacts with the baking soda and buttermilk, making the cake light and fluffy. Additionally, it amplifies the cake’s tangy flavor, which is a signature characteristic of red velvet.
3. Can I make red velvet cake without food coloring?
Absolutely! If you prefer a natural alternative, you can use beet juice or beet powder to achieve a subtle red hue. Some bakers even skip the coloring altogether, resulting in a cake with a warm, cocoa-brown tone. The flavor remains the same, so it’s purely an aesthetic choice.
4. How long can red velvet cake be stored?
When stored properly, a red velvet cake can last up to a week in the refrigerator or several months in the freezer. For best results, wrap the cake tightly to maintain its moisture and flavor. If stored at room temperature, consume it within 2 days to avoid dryness.
By following these storage tips and frequently asked answers, you’ll enjoy every bite of your red velvet creation without worrying about leftovers going to waste! 🍰